How to finally understand your balance, avoid surprises, and stay in control.
Keeping up with your bank account can feel confusing. The balance changes, payments clear at different times, and it can be hard to tell what’s actually available.
Bank reconciliation is the process of matching what you recorded with what the bank shows. When the two line up, you know your true balance. It’s a simple routine that becomes easier once you try it.
In this post, I’ll walk through a beginner-friendly way to reconcile your account in Excel using clear steps and a basic monthly setup. All you’ll need is your bank statement and your transaction list.
Let’s start with the basics so you can feel more confident each month when you check your balance.

What Is Bank Reconciliation (Plain and Simple)
Bank reconciliation is the process of checking that your records match the bank’s records. You look at what the bank says you spent or received, compare it to what you wrote down, and make sure both sides agree.
If they match, you’re balanced.
If they don’t match, you look for the reason.
That’s all it is.
This routine helps you catch missed payments, late charges, double charges, or anything that didn’t clear yet. It also gives you a clear picture of your real balance, not just the number on your banking app.
Why This Step Helps
Reconciling your account gives you a clear picture of your money. It shows what has cleared, what hasn’t, and whether anything looks off. When you do this once a month, it becomes much easier to stay organized and avoid surprises.
A quick recon can help you:
- Spot missed or duplicate charges
- Notice payments that haven’t cleared yet
- Understand your true balance
- Avoid overdraft fees
- Catch small mistakes early
It’s a simple routine, but it makes a big difference in how confident you feel about your money.
What You’ll Need
To reconcile your account, you’ll need three things:
- Your bank statement
- A list of your deposits and payments
- A place to record everything (Excel works well)
That’s all you need to get started.
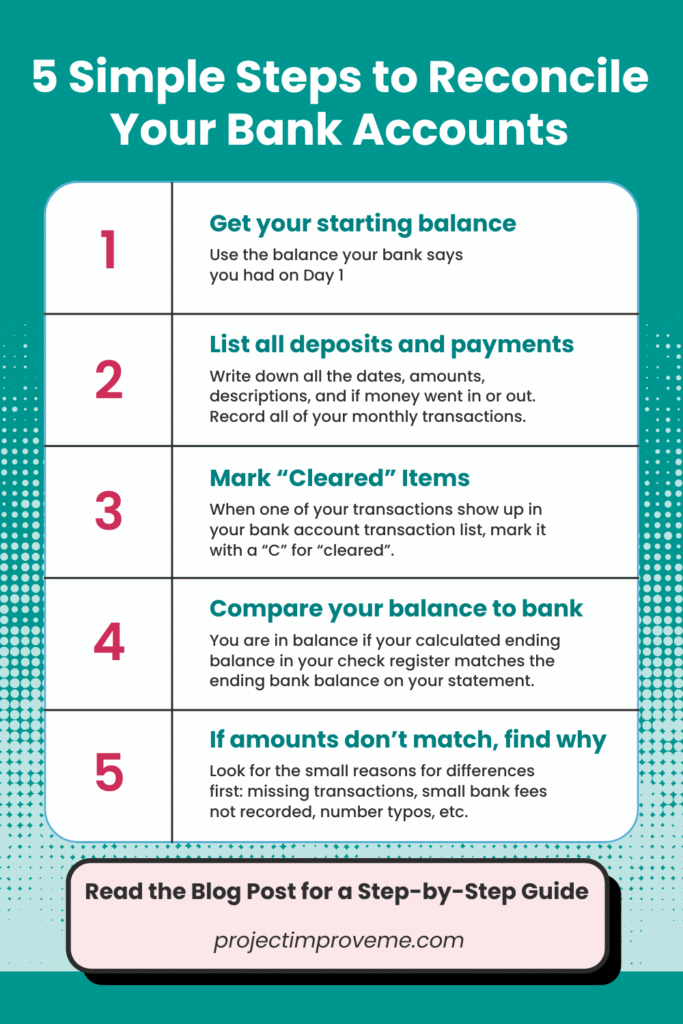
Step-by-Step: The Easy Way to Balance Your Bank Account
1. Start with the balance your bank says you had on Day 1
Look at the first line on your bank statement.
That number is your starting balance.
Quick tip:
If the starting balance doesn’t match your workbook from the month before, don’t panic.
It usually means something cleared late. Just use the bank’s number for this step.
2. List every deposit and every payment
Write down each thing that happened:
- The date
- The amount
- A short description
- And whether it was money in or money out
👉🏼 Payments = money out
👉🏼 Deposits = money in
Quick tip:
If you’re not sure where something goes, just call it “Miscellaneous.”
Getting it written down is more important than getting it perfect.
3. Mark things the bank has already processed (“cleared”)
When a transaction shows up on your bank statement, mark it with a C.
👉🏼 C = the bank has seen it and counted it.
This keeps you from double-checking the same things over and over.
Quick tip:
Debit cards usually clear fast.
Checks and online bill payments can take a few days ~ that’s normal.
4. Check your balance against the bank's ending balance
Now compare two numbers:
- The ending balance in your workbook
- The ending balance on your bank statement
👉🏼 If they match, you’re balanced.
👉🏼 If they don’t, that’s okay — go to step 5.
Quick tip:
Most people get worried here. Don’t.
Even $5 differences have simple explanations..
5. If something doesn't match, look for small things first
Most “problems” are tiny things like:
- A transaction you forgot to enter
- A small fee you didn’t notice
- Something you wrote down that hasn’t cleared yet
- A typo in your numbers
👉🏼 Fix the one item and check again — it usually clears things up fast.
Quick tip:
99% of the time, the issue is one small line.
You do NOT need to redo the whole month.
💡 Extra Tips Most People Never Learn
👉🏼 How to Handle Pending Charges
Pending charges are things your bank knows about but hasn’t fully processed yet.
- Don’t enter them until they show the final amount
- Pending amounts can change (especially gas stations & tips)
- When it turns into a “posted” charge, then add it and mark it C once it appears on your statement
Why this helps: pending charges are one of the biggest reasons balances look “wrong.”
👉🏼 What to check if your balance is off by a few dollars
If you see a difference like $1–$5, don’t assume it’s a “big problem.”
Check these first:
- A fee you didn’t notice
- A subscription you forgot about
- A tip added after you paid
- A refund or credit
- A duplicated entry
Quick trick: sort amounts low-to-high — small errors stand out.
👉🏼 How to track ATM withdrawals
Banks treat ATM withdrawals like a payment.
But here’s the problem:
Most people forget the fees or the cash they still have on hand.
The easy way:
- Enter the full amount the bank took out
- Include any ATM fees
- Add a note if part of the cash is still in your wallet
- Track the cash separately if needed (optional)
👉🏼 What about Zelle, Venmo, Cash App, and PayPal?
These apps can be confusing because:
- Some payments clear instantly
- Some take 1–3 days
- Some transfer only part of the money after fees
Simple rule:
Enter the exact amount that hits your bank account — not the amount the app shows.
👉🏼 How to deal with automatic bill payments
Autopay is great… until you forget when things hit.
Quick fix:
- Add autopay items to your register ahead of time
- Mark them “C” only when they show on your bank statement
This keeps your running balance accurate.
👉🏼 How to track checks (if you still use them)
Checks are slow.
- Write it in the workbook when you write the check
- It may take days or even weeks to clear
- Don’t delete or change it—just wait for it to show up
This prevents overdraft surprises.
👉🏼 How to fix mistakes without undoing everything
If something looks “wrong,” don’t delete everything.
Start small:
- Compare your ending balance
- Look for the first place your running balance changes
- The error is usually right around that row
This trick is how accountants find problems quickly.
👉🏼 Why your bank’s “Available Balance” can lie
Your available balance:
- Includes pending items
- Doesn’t reflect future autopays
- Can look higher than it really is
Your workbook shows your true balance — before mistakes can happen.
👉🏼 Should you enter things in real time or all at once?
Either way works. The end result should be the same; you should match.
But if money is tight, enter things daily or every 2–3 days so your balance doesn’t surprise you.
End-of-month catch-up works too — your workbook will still balance.
Want to come back to this later?
Why a Workbook Makes This Easier
You can track your account on paper or in a blank spreadsheet, but it can get messy fast. A workbook that is already set up removes a lot of confusion and helps you stay organized.
A good workbook should give you:
- A clear running balance
- A simple way to mark cleared items
- A separate space for totals
- A place to review the month at a glance
- A clean layout that’s easy to follow
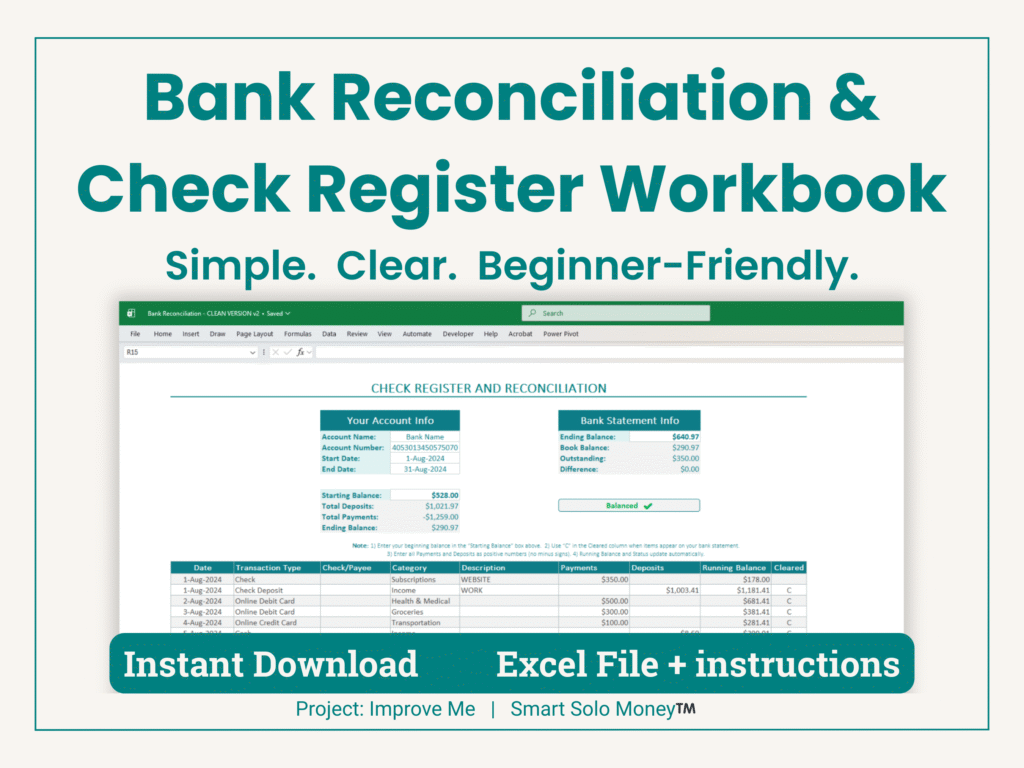
My workbook includes all of these pieces in one place, along with drop-down lists and a quick start guide to help you begin right away.
Smart Solo Money Workbook
Bank Reconciliation &
Check Register Workbook [Excel] – $9
A simple, clear way to keep your money organized — without stress or confusion. This beginner-friendly workbook helps you track your deposits, payments, cleared items, and running balance each month. Everything updates automatically so you can see exactly where your money stands at any moment.
Tips for Beginners
Keeping this routine simple is the key to sticking with it. Here are a few things that can help:
- Start with one month
- Keep numbers positive
- Mark cleared items as you go or at the end of the week
- Use categories only if they help you see patterns
- Keep your process the same each month
Staying consistent is more important than getting everything perfect.
Final Encouragement
If you haven’t reconciled your account in a while, there’s no need to feel behind. Start with the current month and build from there. Once you see how simple the steps are, it becomes a quick routine you can rely on.
A few minutes of attention each month can help you stay more organized, more confident, and more aware of what’s happening with your money.
Frequently Asked Questions: Bank Reconciliations
The easiest method is to compare your own list of deposits and payments with the bank’s list on your statement. When both match and you account for anything still pending, your account is balanced.
Your account is balanced when your running balance matches the ending balance on your bank statement after you mark any cleared or uncleared items. If the numbers agree, you’re done.
Start by checking for missed transactions. Look for deposits or payments you didn’t record, items that haven’t cleared yet, or charges that posted late. Most differences are small and easy to fix.
Once a month is enough for most people. Choose the same time each month so it becomes a steady routine.
A cleared transaction has fully posted to your bank account. A pending transaction is still moving through the bank system. Pending items can make your online balance look different from your real balance.
The bank doesn’t show everything right away. Some payments and deposits take time to clear. Your check register includes everything you recorded, even if it hasn’t posted yet.
No. A simple spreadsheet or check register is enough. Excel is a great choice because it keeps everything organized and updates the balance automatically.
Yes. Excel works well because you can see everything in one place and the math updates for you. It’s simple, clear, and easy to adjust.
Use a layout with the date, description, type of transaction, amount, and a running balance. Mark items that clear the bank. A clean, ready-to-use workbook saves time and keeps things consistent.
Start small. Compare one line at a time. Look for missing entries, duplicate charges, or payments that haven’t cleared. Taking a slow, steady approach usually reveals the problem.
Yes. Begin with your bank statement and add any missing deposits or payments to your check register. Once everything is in place, you can balance your account.
Pending charges don’t count as cleared yet, but they should still be in your check register. They only affect your balance once they post to the bank.
Start with your current month. Enter your starting balance, write down each deposit and payment, and compare it to your bank statement. Keep it simple and go step by step.
Yes. The easiest way is to use a separate worksheet or workbook for each account. This keeps everything clean and prevents mix-ups.
Online balances shift throughout the day because new payments and deposits are constantly clearing. Your own records help you see the real balance behind those changes.
Want a little more help with your money?
Explore Smart Solo Money for simple ways to organize your finances and reduce money-related stress.

Hi! I’m Kari.
I started Project: Improve Me in 2025 to share simple ways midlife women can clear digital clutter, organize life’s details, and make space for what matters most. As a single grandma working in accounting, I know how overwhelming digital life can get. This project is where I share the small systems and habits that help me stay organized and calm.